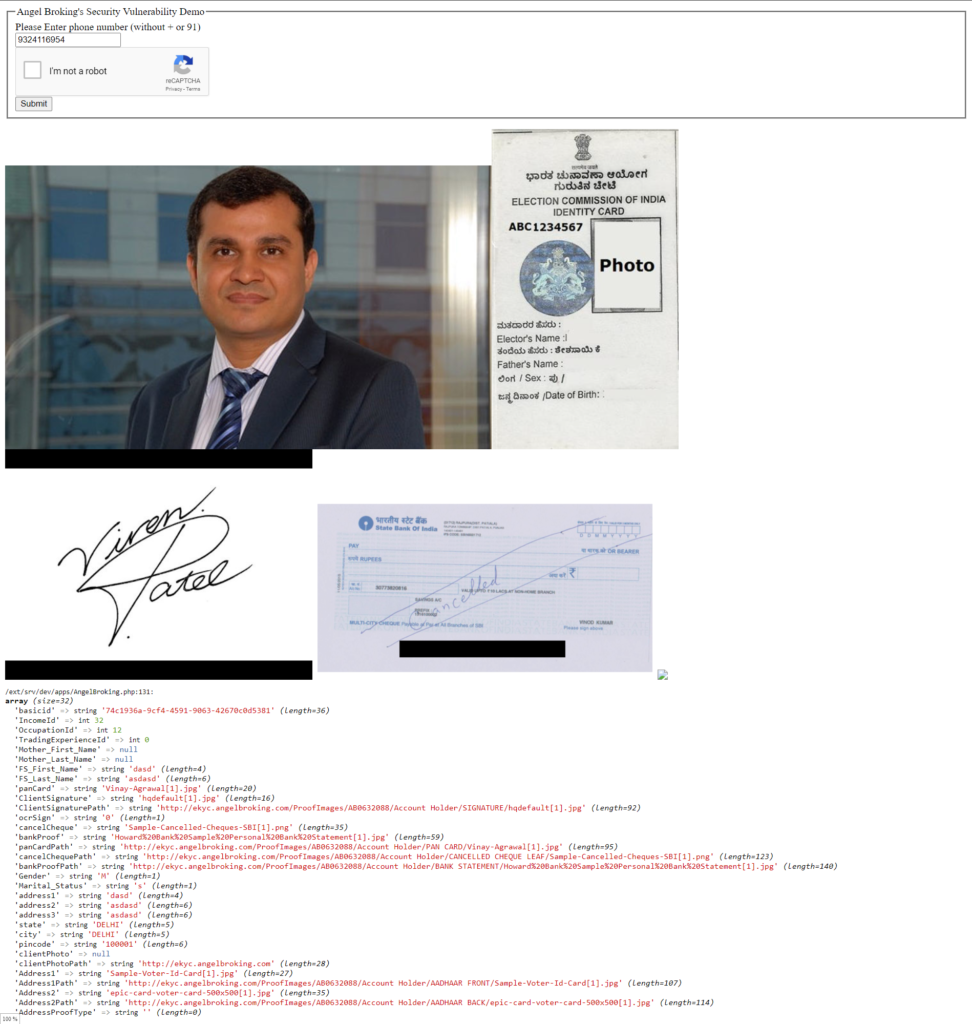
A massive security flaw in Angel Broking stockbroker which let you see profile information and uploaded documents for their customer
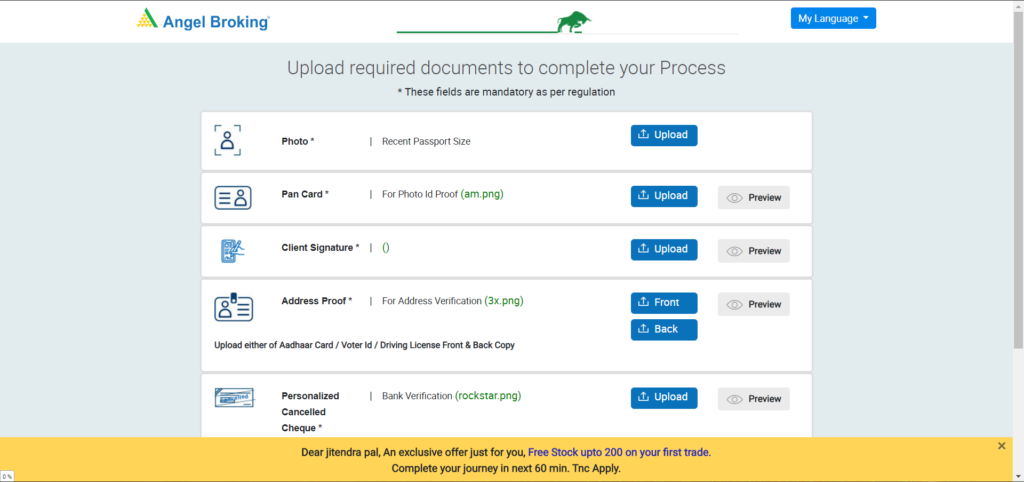
This flaw will let you see the personal details including name, date-of-birth, family member details, PAN card, bank account number, as well as their uploaded documents including signature, address proof, bank statement.
Update:
They have got in touch with me, and have fixed the issue. As such, this demo is not working anymore.
Version 2:
This is a more sophisticated version of the same vulnerability. This example shows how to get full details of any user by phone number programmatically at bulk. For the safety of existing users, I am not writing the steps to reproduce vulnerability at large. Instead, I am writing a captcha protected PoC which can be used to confirm the vulnerability by anybody.
Visit this URL: https://apps.varunagw.com/AngelBroking.php
Test phone number: 9324116954
Version 1:
Here is how you will reproduce it.
- Visit this https://www.angelbroking.com/open-demat-account
- Enter the phone number you want to view details for (it must be already registered with them)
- If they signed up for the platform, you will get all their details and see the documents they uploaded. They don’t do any mobile number OTP verification before showing you the details.
For proof: I created a dummy profile using 9324116954. Try entering this number in the form. Don’t worry it’s an unused phone number from angel broking support team, so no harm to anyone.
This is a direct link to the form generated using the aforementioned phone number
The example shows the account which is not fully created. While I am yet to test for a fully created account, I think it might also work for them too (although with some extra complicated steps).
Windows Firewall friendly: How to create an offline installer for Visual Studio 2019
I’ve been trying to create an offline installer for Visual Studio 2019 but unfortunately, the official Microsoft solution is not very firewall-friendly.
So here is an alternative solution that works well with Windows Firewall whitelist-mode.
Download this collection of the batch files. I have split them into multiple files to make it easier to run them.
Here is the overview of each batch file.
_Step1.bat: It downloads the vs_community.exe
_Step2.bat: It downloads vs_installer.opc
_Step3.bat: It extracts both these files into their respective directory. It’s important to have 7-Zip installed on your PC, otherwise, this step will fail
_Step4.bat: It finally creates the offline installer into the directory written after –layout in the source code. Change the path here to the actual directory where you want to create an offline installation for Visual Studio.
FAQ:
Question #1: What firewall exceptions are required for these batch files to work?
powershell.exe: For _Step1.bat (you can alternatively download that URL yourself to avoid white-listing powershell.exe)
vs_installer_opc\contents\resources\app\layout\setup.exe: For _Step4.bat. It’s a required firewall exception.
Question #2: How do I update the offline installer to include the latest version of Visual Studio
Just run the same batch files again and it will update the offline installer instead of re-downloading everything from the stretch.
How to install Windows Subsystem for Linux (BashOnWindows) offline on Windows
Requirements:
- Fiddler
- HTTP Web server (Apache/Nginx/Any other)
Downloads:
- trusty-server-cloudimg-amd64-root.tar.gz – Official Ubuntu 14.04 image provided by Microsoft
- trusty-server-cloudimg-amd64-root.tar.gz – Daily Ubuntu 14.04 builds provided by Canonical
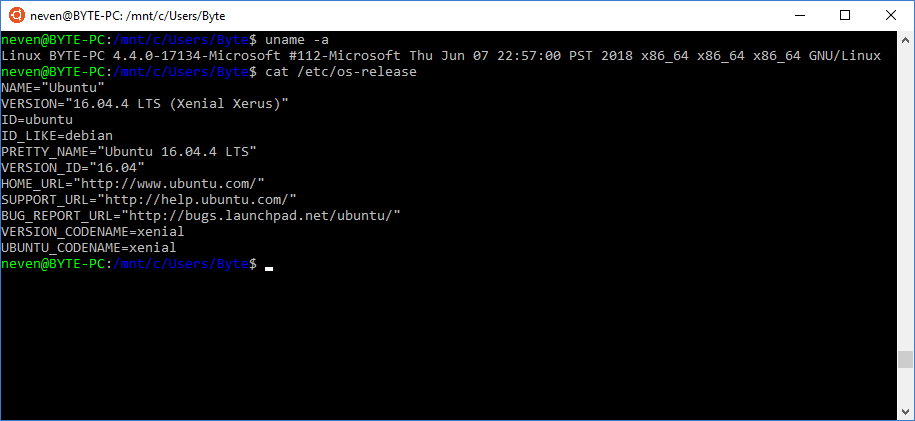
- xenial-server-cloudimg-amd64-root.tar.gz – Daily Ubuntu 16.04 builds provided by Canonical
How To:
- First enable Windows Subsystem for Linux from “Program and Features” -> “Turn Windows features on or off”
- Restart Windows (MS has a thing for rebooting)
- Download one of the image and host it on your local web server if not done already
- Start Fiddler and enable “Automatic Breakpoints” (Alt+F11)
- Start command prompt and run “lxrun /install /y”
- Switch to Fiddler. You will see a request to “https://go.microsoft.com/fwlink/?LinkID=730581”. Click on “Headers” tab -> Right click on “Location” -> “Edit Header” -> Paste your local link URL (i.e. http://localhost/xenial-server-cloudimg-amd64-root.tar.gz) and click on Save -> Run to Completion
- There will be another request to “http://localhost/xenial-server-cloudimg-amd64-root.tar.gz”. Just click on “Run to completion” this time.
- After some time, there will again another request to download “ubuntu.ico”. Just allow it.
- Create a new user and you are ready to go!
Note for Ubuntu 16.04 users:
There is an issue with “sudo” command in Ubuntu 16.04 build. You will get sudo: no tty present and no askpass program specified. There are two simple possible solutions that I am aware of to fix it.
- Use “sudo -S” each time. Execute
echo $'\n'"alias sudo='sudo -S'" >> ~/.bashrcto create a permanent alias for it - Set the default user as root. Execute “LxRun.exe /setdefaultuser root” in command prompt to do that